Monday, December 20, 2010

DIY: Guests' Arrival Bags (aka OOT Bags in the wedding world)

 I purchased the bags from discountmugs.com for $8.54 each (for 25 of them). They double as a beach bag and cooler bag (how cool!). I designed the front of the bag using Word. I wanted to make it wedding-ish, of course but did not want to include our names because I wanted to have the option of selling extras (on one of the many destination wedding blog websites I have stalked for the past 8 months).

Of course, I blinged it out a bit by gluing rhinestones on the front and added cute labels that read "To Have & To Hold...& To Keep Your Drinks Cold." (chuckle chuckle). Clearly I had way too much fun with these bags. The other goodies included:

Welcome Book/Meet the Guests
My invitation RSVP cards were mad-lib style so I included a copy of everyone's RSVP with their photo and how they know the bride and groom. This was a last minute add that I really loved (and hopefully it helped everyone with names/faces)!

Room Key Card Holder
I attached these to the inside of the bag by gluing a safety pin together (so no one got pinched if it came un-done) and clipping it on with the handy-dandy heart shaped retractor clip. :) These were made out of badge holders I purchased from securityimaging.com for 60 cents each (the badge retractor reels were 65 cents each). Of course I added some personal touches like the cute "vowels" (see pic) in the shape of a heart.
Our guests really did seem to love these and used them (which of course made me the happiest bride everrr)!

Koozies
Of course, I had koozies, I mean what is a destination wedding without them? I purchased these from kustomkoozies.com and made them custom with my heart design that I put on the bags. I also added a rhinestone to the heart (I couldn't resist) for a touch of bling. :)


Oh Sh!t Kits
For these I bought little first aid kits that were only $1.00 each and removed the label and added my own (which I designed on Word and printed on to name badges/tags). As you can see, I included bandaids & cleaning wipes, Pepto-Bismol, Excedrin & Gatorade packs.
"In Sickness & In Health" 
For cuts or for hangovers or when Montezuma attacks, 
Find what you need here and know that we've got your back!


Scavenger Hunt Disposable Cameras
 I made several different check-lists & the top read:
"Use your camera & scavenge around, 
Hunt for the pictures that need to be found. 
Shoot away & complete the list, 
Find the moments that we may have missed!"
To make these, I purchased bulk disposable cameras online from . I then took an outline of the paper cover and scanned it into Word. I did my designs and words inside of the layout and then deleted the outline. I created a second Word document and flipped the outline so I could print the outline and the wording on each side of the paper and cut around the lines without it showing on the final product. I used an exacto knife to cut the holes. I then folded and attached them to the cameras using tape and glue. Cutting neatly is not exactly my specialty, but they were still cute!
Not pictured, I also included underwater cameras in both of our parent's bags. These were passed around the pool and should make for good pictures (I haven't developed them yet!)

Wedding Invites: Crystal Rhinestones & Mad Lib Style RSVPs

Although the pictures do not do these invites justice, I have included photos of our wedding invitations below. I worked with Kate from custompaperworks.com to create these custom invitations and am in LOVE with them. My favorite parts of the invite are of course the rhinestones (on both the invitation and on the outside of the pocketfold) and the mad lib style RSVP. We were so excited to get the RSVPs back in the mail and read everyone's unique responses!


Thank you to one of my MOHs, Suzanne Lovern, for helping me put these together!

DIY: Message in a Bottle Save the Dates!


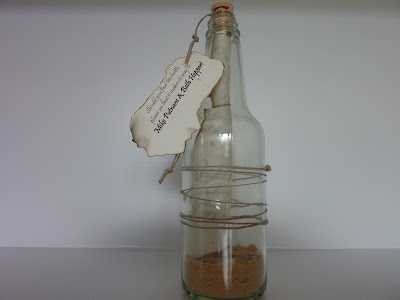
 When I started thinking of a destination wedding, I couldn't think of a better way to "Save the Date" than a message in a bottle. When I started browsing online websites, I was quickly turned off by the pink sand, sparkly sea shells or frilly looking paper. I was looking for something more natural and "realistic" looking. ...They always say if you want it done right, do it your self.


Step 1: Purchase supplies. Supplies needed:
- Glass bottles (I purchased mine from ebottles.com for $1.48/ea including cork)
- Sand (I already had some we had purchased to fill our outdoor basketball hoop)
- Any ornaments or sea shells (I purchased some small sea shells from Michaels)
- A beachy scent (I purchased Pina Colada scent from Michaels)
- Raffia string to tie around your message (I purchased from Michaels)
- Parchment Paper for message (I found mine at Walmart)
- A funnel to fill the sand
- A pencil to assist in rolling the message
- Packaging to mail it in (unless you are hand delivering). I purchased 4x4x8 boxes and brown crinkle paper from ULINE.com. The boxes were perfect size and the crinkle paper stuck with the "natural" look.
Step 2: Print your message on Parchment Paper
 I just used Word to draft my message and printed it on my parchment paper. I also printed name tags to attach to the exterior of the bottle.

Step 3: Give your paper some character!
I choose to burn the edges of my paper using long matches and a candle (to re-light the new matches). This is quite messy...I did it over my sink...and still made a mess and inhaled quite a few fumes but it was all worth it! :)

Step 4: Fill the bottles with sand & add your scent
I used a funnel I found in the garage and filled the bottles pretty easily (I filled the bottom about 1 inch to ensure I left enough room for the message). A helpful tip is to "bake" the sand before using it. This allows the sand to dry out as much as possible so it doesn't stick to the edges when you're filling the bottles. After filling, I added a few drops of the Pina Colada scent in each bottle and dipped the bottom of the corks in the scent. (p.s.- This was my favorite part. Every time I smell this scent now it makes me think of the bottles, the engagement, the wedding, very happy thoughts)!

Step 5: Roll the message and tie with string
By far the most difficult and tedious part. Rolling these little suckers small enough to fit in the bottles was not simple (or fun) but it did get easier as I got the hang of it and you have to keep in mind that the crinkles are all giving the paper a little "character." I used a pencil to roll it, starting at one end and keeping it as tight as possible. There really isn't a rhyme or reason to the method except for practice. Once I got it small enough I quickly put the end inside of the bottle before it expanded any and I had to start all over :). THEN I tied the string around the middle of the paper and left about 4-5 inches of string hanging out the top of the bottle. Next, press the cork in (it goes in pretty easily, especially after dunking it in the scent so don't press too hard!).  Then repeat, repeat, repeat! :)

Step 6: Attach label & finish with string
I punched a hole in the label using the tip of my pencil (a hole punch would have created an "unnatural hole) and then just tied knots in the string around the label. The bottle looked a little plain so I tied some string around the bottle to spruce it up a bit. I thought it looked quite nice.

Step 7: Box them up and ship!
I stuffed my boxes with lots of the brown crinkle paper and made sure they would not break and then taped them up. To label the boxes, I printed addresses and return labels on my parchment paper. I just ripped the paper to give it "character" and glued it to the box. I also created a label that said "FRAGILE, This Side Up" using the same paper and rip/glue method. I hand delivered a few of them and shipped the others. The shipping of course took up the majority of the cost but I was proud and excited about the bottles (and I think it was worth it..the price and the time consumption!).

*Other good ideas, that I did not use:
- Using a plastic bottle so you can just ship it without boxing it...would also be cheaper.
- Giving your paper character by using tea bags, rather than burning the edges.